Gamma is a machine vision technique used to correct the difference between the digital image readout and the perception of the human eye. It can also be used to correct over illuminated spots. This is a detailed article about Gamma correction.
What is Gamma Correction?
A camera sensor converts light intensity of a pixel into equivalent digital value. The digital value is directly proportional to the light intensity of a pixel and hence has a linear relationship. However, a human eye perceives the images as a logarithmic function of intensity instead of a linear function. If the images from a camera sensor are directly displayed on a display device, then the scene will appear unnatural because of the differences between the camera sensor and human eye perception. To compensate this, the image from the camera sensor goes through the gamma correction.
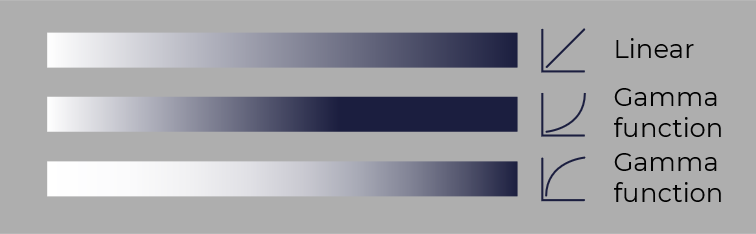
Gamma correction will adjust the distribution of tones. In direct comparison we can see that the linear tones are more focused on the bright part of the image. Dark tones become indistinguishable whereas with Gamma correction, we have more dark tones.
Benefits of Gamma
As described above, Gamma adjusts digital images to the perception of our eyes. The main benefit of using Gamma is the more natural look of images and the ability to differentiate between dark tones in a darker image. Without gamma correction, darker objects in images would become unrecognizable. Another benefit especially for computer vision applications, is the possibility of fixing over illuminated spots in the image. When dealing with reflecting surfaces, it may happen that you get spots that reflect the light so that you can’t see the immediate surroundings of that spot. With gamma correction you can counteract this effect to a certain degree.
How to enable Gamma on your camera
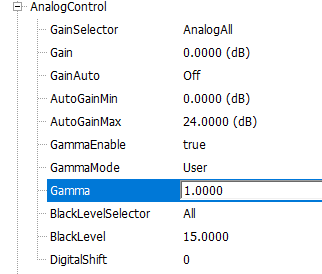
Open the Galaxy Viewer and connect your camera. Navigate to Analog Control on the right side and set GammaEnable to true. For a custom gamma value, you need to switch the Gamma Mode from sRGB to User. Now you can manually select a Gamma value.
How to use the Gamma feature
To nullify the over-illuminated spots on your image, turn down the exposure time until you can see what’s behind the bright spot. Afterwards, you can set a gamma value to increase the brightness of the image. You will see that the dark spots will get brighter, and the bright spots won’t get too bright again.
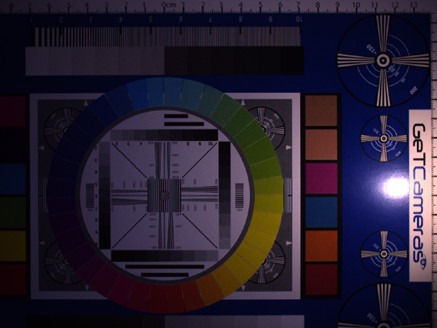
If you look at the 3 images below you can see that in the first image, you cannot read GeT Cameras properly. In the second image you can read GeT Cameras, but the left side is too dark. On the third image you can see what happens when we apply gamma. Now we can read GeT Cameras and the left side is evenly illuminated and bright enough.
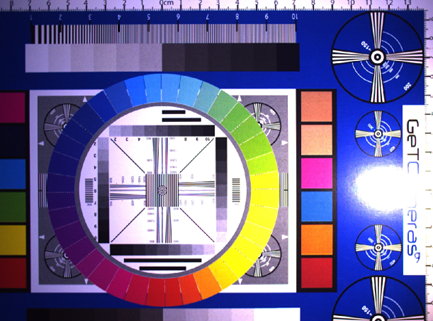
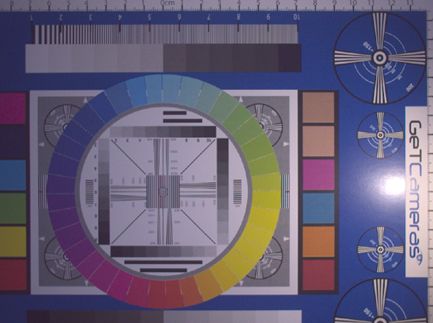
Gamma = 1; Exposure Time 17ms, GeT Cameras not readable, colors on the left-hand side visible
Gamma = 1; Exposure Time 4ms, GeT Cameras readable but colors lefthand side not visible.
Gamma = 0.5; Exposure Time 4ms, GeT Cameras readable and colors on the lefthand side visible.
Which industrial camera models support Gamma?
A list of industrial cameras that support gamma can be found in our
download area.
Contact us for help selecting the right camera
