Aravis is a machine vision software kit developed to simultaneously use machine vision cameras of different manufacturers. Aravis is a GObject based vision library originally created for Linux to control and acquire images from digital industrial cameras. Aravis uses the GenICam API to operate the machine vision cameras and comes with a basic viewer interface. It is also built like any other Meson build. You can download Aravis for free at GitHub.
In this article we describe how to install Aravis on Linux using Python and how to start acquiring images from the industrial camera.
Step one: Install Python and Pip on your Linux computer
Open the Linux terminal and put in the following lines to install Python and Pip:
Select a Python version that is compatible with your Linux distribution, such as Python 3.8.
$ sudo apt update
$ sudo apt install python3.8
$ sudo apt install python3-pip
Use the lines below to check if Python and Pip are installed on your Linux computer:
$ python3 --version
$ pip3 --version
Step two: Install Meson and Ninja
Now install Meson and Ninja with Python:
$ pip3 install --user meson
$ pip3 install ninja
The basic requirements are now installed.
Step three: Install the latest version of Aravis
As we install Aravis from the source, there is only one version for Linux, Windows and Mac.
Download the latest Aravis release at
https://github.com/AravisProject/aravis/releases.
Before we can build Aravis, we need to install the dependencies. You can find the detailed list of dependencies in the “meson.build” file

To install most of the needed dependencies, you can use the following command:
$ sudo apt install libxml2-dev libglib2.0-dev cmake libusb-1.0-0-dev gobject-introspection \
                 libgtk-3-dev gtk-doc-tools  xsltproc libgstreamer1.0-dev \
                 libgstreamer-plugins-base1.0-dev libgstreamer-plugins-good1.0-dev \
                 libgirepository1.0-dev
Optional: For color vision cameras, you need additional plugins for “gstreamer”:
$ sudo apt-get install gstreamer1.0-plugins-bad
Before you can build Aravis, you need two more things:
1. Install the newest version of “cmake”.
Follow the Linux tutorial on their website:
Installing | CMake
2. Now install “gi-docgen” with the following line:
$ pip3 install --user gi-docgen
Now we are ready to build Aravis. To build Aravis, use the following commands.
$ meson build
$ cd build
$ sudo ninja
$ sudo ninja install
The last thing we have to do is to copy the “aravis.rules” file to the Linux device manager “udev: etc/udev/rules.d”
$ sudo cp ~/Path/to/your/Aravis/src/aravis.rules /etc/udev/rules.d
Reboot the computer to complete the installation. After restarting your computer, you can navigate your Linux terminal to the viewer and start the program.
~/Path/to/your/Aravis/build/viewer$ ./arv-viewer-X.X
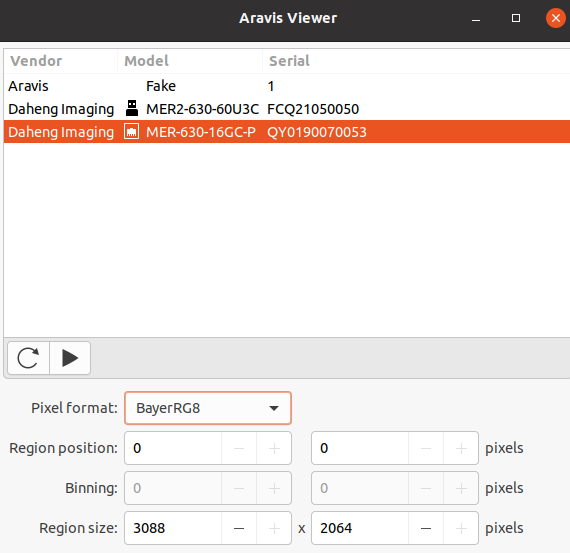
Connect your camera and click on the reload button. You should now see the name of your connected camera and its serial number. Left-click your camera and press on the play button to start the acquisition. You should now get a live feed from the selected camera.
 (Tested on Linux Ubuntu 20.04, with a MER-160-227U3M-L machine vision camera)
The Aravis viewer works for both our USB3 and our GigE cameras. For the GigE cameras, you have to configure the IP settings first as you would have to with GalaxyView. After the IP is configured, the GigE camera will work with the Aravis viewer.
Need technical support?
Did you follow these steps, but did not receive the result from the industrial vision camera that you desired? Get in touch with our
technical support staff! One of our vision engineers will answer your question within 24hrs. Do you have other technical questions regarding machine vision? Take a look at our
machine vision knowledge center. We upload new technical articles regularly.
If you want to stay up-to-date with our vision articles, follow our page on
LinkedIn. We post every new article after the release.
